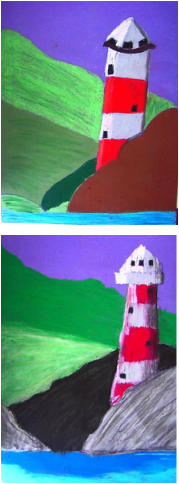
The Grade 4 students made these lighthouses as a part of their Social Studies unit which explores landscapes in our province and across the country. Students started with a piece of blue construction paper. They used a pencil to sketch the hills and lighthouse. This was done as a step by step. They started by drawing the waterline, then a rock. The lighthouse was added next. I described it using basic shapes; a crooked rectangle, and a triangle. They finished the sketch by drawing the rolling hills behind the lighthouse. After the sketches were drawn, they coloured their lighthouse with red and grey stripes using pastel. I showed students that they could make their lighthouse look rounded by adding white to one edge and black to the other. They finished their artwork by colouring the rocks and rolling hills.
These sunsets were a 2 day project by the Grade 4 class. The first phase was the sunset background. Students started with a white circle on their page. They increasingly added more orange to their colour as they made larger and larger circles. On the second day, students drew the trees and coloured them in with a black sharpie marker. The grass was made using the same tinting process as the sunset. Students started by making a light green and painting it on their page. They used a middle tone for the next layer, then they used the darkest tone for the bottom. The small buds on the trees were added last. These pictures are a review of the colour wheel just in time for spring rain! The colour wheel was coloured first in marker, then cut out and glued onto a larger, thicker piece of paper, Students drew the raincoat, pants and boots with a sharpie marker. They painted the clothing with tempra paint. The puddle and raindrops were the final step. Students "flung" the blue watercolour paint onto their page, then lifted it up to give the dripping effect of the raindrops. For the puddle, they painted watercolour (with lots of water!) then sprinkled a bit of salt on top to give the illusion of ripples in the water. These chicks were a VERY cute idea from pinterest. Students stamped yellow circles and made lines for wings. The orange beaks were cut out of construction paper and glued on so that they open and close. They used sharpie marker to add the little details like eyes and hair. Too Cute! Spring has finally sprung here in the halls of K Park Elementary School. The first step in making these was tearing a piece of brown paper and placing it on a white piece. Next, different shades of green paper were cut into strips and glued on to make the grass. Then, the lady bugs were cut out of red and their heads were cut out of black. Finally, the details were added to the ladybugs, such as, dots, stripes, eyes and legs. This is a fairly simple project with stunning results. A sneak preview! We taped these down and divided the page in four quadrants with painter's tape. The students wrote the letters L, O, V, E in the quadrants. They traced their letters with pastel, then washed overthem with waterpaints. Once the paint was dry, the tape was taken off to reveal nice, straight boxes. Lovely! This was an art enrichment activity which some students chose to do during a rainy indoor recess. The bunny body and head are 2 curved lines. The ears are diamonds and the nose is an upsidedown triangle. By drawing the bunny on a blue piece of construction paper, the white and green pastel really "pop". This idea is from the blog "The Teacher's Art Closet" . How cute! I was out for our regular art lesson on Friday, but was delighted to come back on Monday and find these wonderful Spring Sheep. Great idea Miss & Mrs. Urdang! Mrs. Urdang and I made these as a part of our Easter celebration today. The face cloth was folded into the middle then rolled in towards the middle again. They were then folded in half (hiding the rolls). One elastic goes aroung the neck to make the head and the corners of the cloth make the ears. The ribbon hide the elastic around the neck and the eyes, nose and tail were fixed on with a glue gun. How cute! This woven artwork was made visually interesting by adding strips of cut magazines to our construction paper before beginning the weaving process. We helped our students out by prepping square weaving mats with slits. We put tape around the edges so that they would not tear through the paper as they weaved. Students were asked to go "in and out" with their strips of construction paper (similar to the grandfather in the book "Something From Nothing"). As students finished, they were asked to help others who may have been experiencing difficulty. This art project idea came from http://plbrown.blogspot.ca/. Today we finished our artwork which was inspired by the changing seasons. On Friday, students drew their hills, roads and buildings. They were encouraged to consider that as things got further away they would look smaller in size and lighter in colour. The rolling green hills and sunny day tie in nicely with the beginning of spring coming up on Wednesday. This artwork was inspired by the paintings on the following website: http://johnpost.us/painting-lessons/landscape-paintings.html |
I am an enthusiastic educator who loves combining great books, art and writing in my lessons. Visit my Teachers Pay Teachers store for free ideas and activities to enjoy with your students!
AuthorRenee Landry is an Elementary School Teacher in Rothesay, NB. SeasonsSeasonsSome of my Favorite Sites:
http://www.zartart.com.au/html/gallery.html http://www.artprojectsforkids.org/ http://www.district6.nbed.nb.ca/artgallery/artgalleryindex.htm |