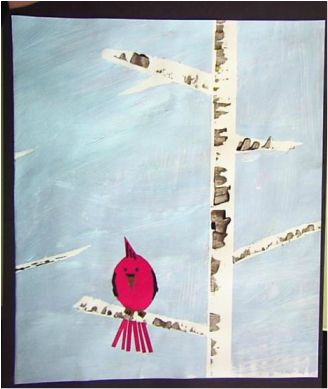
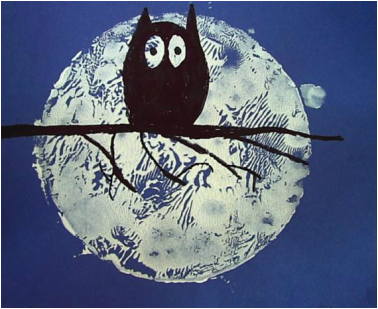
Love this one! The moon is a print done with a round piece of styrofoam and white paint. The branch was added with a black sharpie once the paint had dried. The owl was explained as an oval with two small triangle ears. They left two spaces for the eyes before coloring in the owl. The effect is awesome!
Students used tape to mark out where their birch tree would stand. They painted over the tape with light blue paint, then lifted it to reveal the whtie trees. Students then used a straight edge object and black paint to mark the bark on the trees. The bird was made with construction paper.
We made these as our first art project this year. Students chose a "group" of pastel colours in light and dark shades. They were given a square black piece of paper and were asked to start with one square in the middle then expand the size of their square as they continued in different colors. They were mounted on similar colors, but would also loo interesting mounted on complimentary color
Using craft paste and tissue, students glued square tissue on their paper as a background. Next, they added their heart cutout on top. We let them dry over the weekend (they were VERY wet!). Next, we chopped the messy edges off. These should be made on cardstock or a heavy paper because they curl up quite a bit as they dry. This would also make a very nice window hanging if transperencies were used rather than paper. I did this project with a group of grade 5 students several years ago. students drew the outline of the animal by following my example - step by step. They decorated the inside with a variety of shapes. Students used warm colours in a variety of tones to colour the picture. Outlining the image with black sharpie marker really helps to make the image pop. For my younger students, I will give them a photocopy of the outlined animal. This year is the year of the horse...how exciting! Students love Pete the Cat, and this new Christmas book does not disapoint. They were very excited to make their own Pete. I drew the outline of the cat and the students drew the hat, eyes and nose. Then they painted him. Doing this activity a second time with a different group of students, we made the stars on a yellow piece of paper and glued it on after. These stars are "brighter" than the ones which were coloured directly onto the red paper. The grade 2\3 students enjoyed the 3D candy canes so much that I came up with this Christmas tree which uses the same shading concept. I drew the tree shape and the star for them to save some time in our 1 hour lesson. Although, if I had more time for my art lessons, I would definately tackle drawing the tree and star with the older grades. Oil pastels were blended on the tree by overlapping the colours as the colour is applied. The shading on the tree is created by using 2 shades of green and a white. the pastel is applied in a curve shaped motion to create the cylinder effect of the tree. For the star, students made a dot in the center of the star and extended lines from the dot to each angle of the star shape. The star was then coloured in interchanging shades of yellow. I think this tree would also look really great in non-traditional colours. Same prep - two projects! To help out the K's and 1's, we drew a triangle on their page to guide the edge of the tree. We also traced the stars so that they could simply cut them out. The focus of this lesson was positive space and negative space. We talked about how in the first tree our eye is drawn to the tree, whereas in the second tree our eye is drawn to what is happening behind the tre. The grade 3 students called these 3d candy canes. The 3d effect is made by using white, then a dark and light shade of pastel. They started by drawing the outline of the candy cane. They used the dark pastel in a back and forth motion on the outside line of the candy cane. Then they used the same motion to make a white line down the middle of the candy cane, being careful to leave a space between the dark and the white. The lighter shade is used blend the dark and the white by running the colour from side to side through the other shades. These ornaments were easy to make for our Kindergarten students. They started by lightly tracing a circle with a pencil. They filled in the circle with different types of lines. We talked about zigzag lines, dotted lines, broken lines, wavy lines and droppy lines. These types of lines can also be thick or thin. Finally they added a string and erased the pencil lines. This activity went very well with the book "10 Trim The Tree'ers". After reading the book, we made our own version of a holiday counting book. One page of our book was "2 hanging ornaments". What a wonderful way to blend Art, Math and Language Arts for the Christmas season. This is the second time that our Grade 2/3 class has experimented with pastel on black construction paper. The students started off by drawing their snowman and hat in white. using a circular motion they coloured in the white snowman body. Using 3 shades of blue and starting on the outside edge of the snowman, they made a "C" shaped shadow. They were directed not to leave any of the original white showing on the outside edge. using the same 3 shades of blue, students filled in the hat starting with the darkest shade on the left and working towards the lightest shade on the right. The details were then added to the face and two shades of brown were used for the arms. Snowflakes are simple white "X's". The ground that the snowman sits on is rounded in white and brown to show shadow. These were made by k, 1, 2 & 3 students in our school who are reading buddies. The older students helped their little buddies if they were experiencing difficulty. This project was inspired by the Leo Lionni book "An Extraordinary Egg". It is a collage piece. The first step was painting a piece of paper in the desired shades of green or grey. Students made 2 shade of the colour (one for the body and one for the arms and legs). Once the paint was dry, students used a cardboard cutout, which I made, to trace the outline of the animal onto their painted pieces of paper. Next, they cut out the shapes and glued them onto a new page to form their alligator or frog. A white circle was added for the eye and a sharpie was used to draw in the eyeball and the mounth. For the rocks, students put all of their scraps together and formed jagged shapes. They glued them to the bottom of the page to look like rocks. The final step was adding a bit of blue paint around the image to make the sky. We have been studying penguins as a part of You and Your World. These penguin pictures were inspired by the website Deep Space Sparkle. We started by painting the sky in bright colours. We then made our icebergs. The shadows on the icebergs were created by making a thin paint line and pushing it down with our fingers. We then cut "U" shapes in black and white, flippers, a beak and eyes. Finally, the penguin was assembled and glued onto the iceberg. Thank you to Heidi, our District Visual Arts Mentor, for the powerpoint which went along with this lesson. These large hearts were made by hand painting (painting with our hands!). We first covered the surface of a large scroll of paper by mixing red, white and yellow paint on the page with our hands. Once it was dry, we traced and cut out hearts in all shapes and sizes. We made a large pile with all our hearts and the students were asked to estimate how many hearts were in the pile. They were asked to take into consideration how many students are in the class and aproximately how many hearts each student cut out. After each student had a chance to share their estimation, we counted our hearts to see how close our estimations were.. P.S. We had 76 hearts...for those of you who are curious! From math to art! We created these mosaics by making a 100 chart and adding colourful squares cut from magazines. The students were each given a 100 chart with 1" by 1" squares. Once they filled in the missing numbers they started putting on their 100 squares. To save time, they put glue on an entire row of ten then quickly added the squares before the glue dried. This reinforced the idea that each row in a 100 chart has 10 squares. From start to finish, this project can be completed in an hour. These were made at Christmas time and sent home on the last day of school before the break. I got the idea from http://plastiquem.blogspot.ca/2011/12/mes-tapes-dalbum.html. It is a spanish art teacher's website from Barcelona, which just goes to show that the language of art is universal. Even though I could not read her instuctions, I think I managed to do it justice. The students started by making light pencil lines in the form of a triangle. Then they put straight lines across the whole page (through the triangle). After, they traced their pencil lines with white pastels. Using watercolour, each box was coloured a differen shade. We were able to contain the watercolours inside the pastel lines. Students were asked to use cool colours on the inside of their tree and warm colours on the outside their tree. When using watercolours, they are encouraged to let the colours "pool" so that they get a varitey of tones in their finished piece. Our students were very proud of the results and were happy to take them home for the holidays. I came up with this little art project when I was looking for something to do as an art lesson and came across a massive amount of tissue paper in the art room. Sometimes inspiration comes from what is available! This was a great lesson that we used to introduce the idea of colour tone to our classes. The idea that the sky has a variety of blues was something that the students could relate to once they were shown pictures of various skyscapes. These skyscapes are made with tissue paper. The children cut pieces of blue tissue paper and glued them to a white piece of paper from darkest to lightest. We then glued our tissue trees on top. Mrs. Urdang and I trimmed the sides and laminated them. These snowmen were inspired by a walk down the hall at Rothesay Elementary School. Mrs. Verner's class had these wonderful snowmen hanging in the hallway and we thought we would try them with our classes. They go with the book "Snowmen at Night". Torn pieces of white paper create the snowman body. The snowflakes are white crayon. Mrs. Urdang and I cut the carrot noses and eyes for the kids. Thanks for the inspiration RES! Inspired by the book "The Lonely Innukshuk", our grade K and 1 classes created these wonderful paintings. These were fun to draw because we did not have to focus on making straight lines. Joanne and I traced the drawings with black marker to help the innukshuk stand out. The background was painted with watercolour first, after it dried we used finger paints for the body of the innukshuk. |
I am an enthusiastic educator who loves combining great books, art and writing in my lessons. Visit my Teachers Pay Teachers store for free ideas and activities to enjoy with your students!
AuthorRenee Landry is an Elementary School Teacher in Rothesay, NB. SeasonsSeasonsSome of my Favorite Sites:
http://www.zartart.com.au/html/gallery.html http://www.artprojectsforkids.org/ http://www.district6.nbed.nb.ca/artgallery/artgalleryindex.htm |