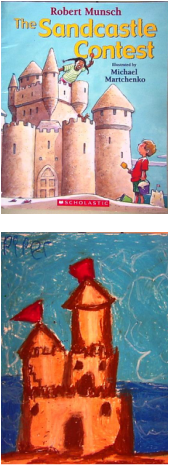
Summer Vacation is upon us! As our last art project of the year, my students drew and coloured sandcastles. The drawing was done step by step. The first line was the sandy horizon line on the bottom of the page. In the next steps, students drew their castles from the bottom up. They chose how they would like to tower their castles. Then, they added details like doors and windows. Student then drew the line behind their castles where the sky and water meet. Using a dark brown pastles, students outlined the shapes in their castle. Next, they coloured the rest of their castle light brown. To give the impression of light, students added white to the middle parts of the shapes in their castle. Dark blue was added for the water and light blue for the sky. Some student added white clouds and waves.
The Grade 4 students made these lighthouses as a part of their Social Studies unit which explores landscapes in our province and across the country. Students started with a piece of blue construction paper. They used a pencil to sketch the hills and lighthouse. This was done as a step by step. They started by drawing the waterline, then a rock. The lighthouse was added next. I described it using basic shapes; a crooked rectangle, and a triangle. They finished the sketch by drawing the rolling hills behind the lighthouse. After the sketches were drawn, they coloured their lighthouse with red and grey stripes using pastel. I showed students that they could make their lighthouse look rounded by adding white to one edge and black to the other. They finished their artwork by colouring the rocks and rolling hills. These sunsets were a 2 day project by the Grade 4 class. The first phase was the sunset background. Students started with a white circle on their page. They increasingly added more orange to their colour as they made larger and larger circles. On the second day, students drew the trees and coloured them in with a black sharpie marker. The grass was made using the same tinting process as the sunset. Students started by making a light green and painting it on their page. They used a middle tone for the next layer, then they used the darkest tone for the bottom. The small buds on the trees were added last. Spring has finally sprung here in the halls of K Park Elementary School. The first step in making these was tearing a piece of brown paper and placing it on a white piece. Next, different shades of green paper were cut into strips and glued on to make the grass. Then, the lady bugs were cut out of red and their heads were cut out of black. Finally, the details were added to the ladybugs, such as, dots, stripes, eyes and legs. This is a fairly simple project with stunning results. |
I am an enthusiastic educator who loves combining great books, art and writing in my lessons. Visit my Teachers Pay Teachers store for free ideas and activities to enjoy with your students!
AuthorRenee Landry is an Elementary School Teacher in Rothesay, NB. SeasonsSeasonsSome of my Favorite Sites:
http://www.zartart.com.au/html/gallery.html http://www.artprojectsforkids.org/ http://www.district6.nbed.nb.ca/artgallery/artgalleryindex.htm |